

How To Resize Photos To Send In Email Windows 7
No matter which digital camera yous use, the pictures it produces will be quite large files. To save space on your reckoner'south hard drive or to e-mail or share them online, yous may wish to resize photos in Windows Photo Gallery. This can be achieved in a few uncomplicated steps.
Before you lot can begin, yous'll need a photo software program. In this guide, we've used the free Windows Photo Gallery. However, you'll find that other programs such every bit Photoscape and Pigment.cyberspace follow a very like process.
You'll need:
- a estimator with Windows Photo Gallery installed
- any photos you'd similar to resize saved in a folder on your estimator or on an external storage device.
Follow these stride-by-footstep instructions to resize a photo
In Windows Photograph Gallery, yous can either resize photos one at a fourth dimension or select a group of images and resize them all at once. However, when resizing a group, y'all can only apply 1 size to the whole group. So, offset we'll explain how to resize a grouping of photos. And so nosotros'll bear witness you how to resize an private prototype.
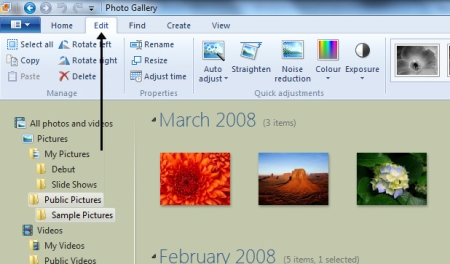
Step one: When you open Windows Photo Gallery, you'll come across thumbnails of all your photos tiled across the screen. At the pinnacle left, yous'll see v tabs labelled 'Dwelling', 'Edit', 'Find', 'Create' and 'View'. Past default, you'll be in the 'Home' tab when you open Windows Photo Gallery. To resize your photos, you offset need to click Edit.
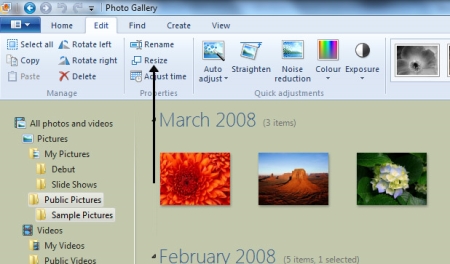
Pace 2: To resize a grouping of images, select which photos yous would similar to make bigger or smaller. When you hover the mouse arrow over each epitome, a modest box appears above it. Simply click to tick the tickbox in the top left corner and select each of your images.
Pace iii: When y'all've made your selection, click Resize in the third cavalcade of buttons along the top.
Step 4: A pop-upwardly window will announced that offers a drop-down list of sizes ranging from 'Smaller', 'Small', 'Medium', 'Large' to 'Custom'. 'Custom' allows you lot to manually enter your desired dimensions if you have a specific requirement in heed.
However, more often than not the 'Medium' and 'Large' options will be big enough to make prints or share your images online.
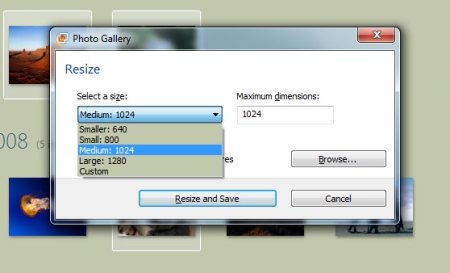
Pace 5: Once yous've selected your desired size you tin can click Resize and Relieve if you're happy for this resized photo to replace the original.
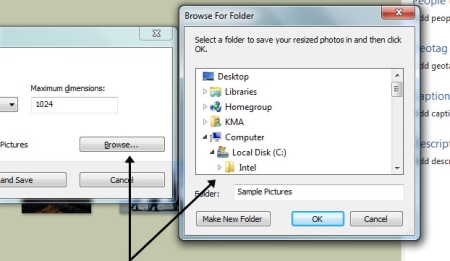
If you'd like to keep the original photo and save the resized ane as a divide, new prototype, click Browse. This will bring upwards a listing of folders. Selecting a different folder will keep your original paradigm as information technology is, in its existing location, while your resized version will be saved to the new location.
Step 6: You can also create a new binder in which to save your resized photo. After yous click Browse, simply click Brand New Folder at the bottom of the pop-up window.
Footstep 7: Once you're happy with your size and folder selections, click Resize and Save and yous're done!
Step 8: Resizing an individual photo is very similar. Simply double-click the desired paradigm from your thumbnails in Step 1 in a higher place. You'll then see a larger version of this photograph. You tin can now follow Steps 2–seven.
Cropping photos
Cropping a photo is some other easy way to resize a movie – but you should note that, when doing this, y'all risk making it 'noisier' (that is, grainier) and less sharp.
For example, think of your flick as a painting on canvass – let's say, the Mona Lisa. If you desire to ingather in closer on Mona Lisa'southward face and remove all of that crazy background landscape, the crop tool is the same as if you took a pair of pair of scissors and cutting her face out of the painting, then stretched it out to fit the aforementioned size of frame. Obviously, the pigment will crack and distort. This is what can happen if you ingather a photograph, even if the cropped photo is smaller than your original image.
That said, cropping can often be your best option. Hither'due south how to practice information technology …
Step i: In the Windows Photograph Gallery at the top of your screen, click Crop.
Step 2: A grid will appear on the photo. Drag the edges of the grid with your mouse to resize information technology over the section of the image yous'd similar to retain.
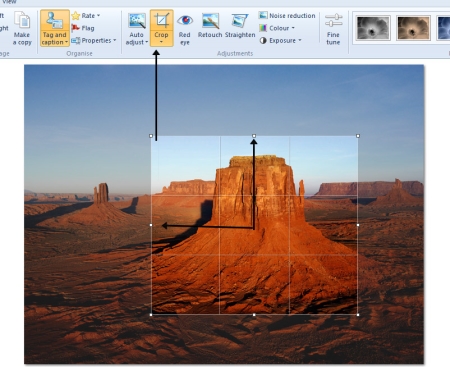
Step 3: Press the 'Enter' key on your keyboard and Windows Photo Gallery will eliminate everything else from your epitome that wasn't included in the box.
Online photograph resizing tools
There are a number of other online photograph resizing tools that you lot tin can use. Popular photo-resizing websites include DrPic, Web Resizer, Compress Pictures and Resize Your Prototype. Simply type one of the names into Google and it will be the first result. All of these tools are free to use.
Source: https://www.digitalunite.com/technology-guides/digital-photography/editing-photos/how-resize-photos-windows-photo-gallery
Posted by: hansenmirere.blogspot.com
0 Response to "How To Resize Photos To Send In Email Windows 7"
Post a Comment